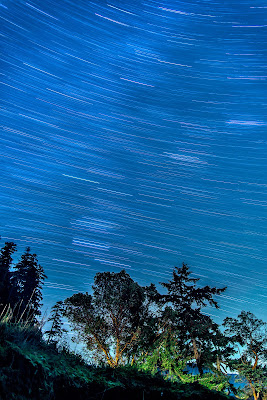
One Long Exposure
To capture star trails with one long exposure will require the use of a cable release to keep the shutter open, as the default time for cameras is 30 seconds. All you will need to do is attach the cable release and set the camera to "Bulb". As with other astrophotography you will want the darkest sky possible as the ambient light for the long period of time will not do much for the star trails. The exact amount of time will depend on the situation you are in, ranging from 10 to 30 to even 90 minutes. You do not need a very high ISO, 100 to 800 might be sufficient, test shots will help you figure out the settings. You will also want to turn on the Long exposure noise reduction (LENR) setting on the camera. LENR is used to to reduce the "hot pixels" that is created when the sensor starts to warm up and create red and blue pixels in the images. LENR will take to images for the same amount of time, one with the normal image and one with a dark frame. The camera will then reduce and eliminate the hot pixels and create one image. The down side is that it essentially doubles the time for one picture, a 20 minute exposure will be 40 minutes.Image Stacking Shorter Exposures
The second method is to take sequential images and then stacking them together in post processing to create star trails. To create your images you will set your camera as if capturing standard images in astrophotography (See the blog on capturing the Milky Way (http://jblmodrphoto.blogspot.com/2016/11/astrophotography-photographing-milky-way.html). You will want to wait a couple of seconds between exposures to let the buffer finish processing and to also let the sensor cool down to reduce noise. Remember to turn off LENR as this will introduce gaps in the star trails.You can use free software such as StarTrails (www.startrails.de) or StarStax (www.marks-enzweiler.de). Photoshop can also be used to create star trail images. Load your images as layers in photoshop, select all layers except the bottom layer and change the blending mode to "lighten". Another method is to turn off all the layers except the bottom one and then turn them on one at a time and change the blending mode to "lighten". As you do this any unwanted trails from airplanes can be removed, continue until comlete.
Advantages and Disadvantages
Long Exposure - Advantages1. Less post processing.
 2. When using the cable release the exposure can be set and left alone for a long time without intervention or oversight.
3. LENR can be used to improve images
4. No gaps in trails.
5. No intervalometer is needed.
Long Exposure - Disadvantages
1. It is all or nothing.
2. There may be uncorrectable noise
3. Headlights, flashlights, airplanes may spoil the whole image.
4. LENR turned on double the exposure time.
5. Requires very dark skies
Short Exposure - Advantages
1. Headlights, flashlights, airplanes mark up one image, the image can be dropped from the stack or edited out easily.
2. May be only solution for strong ambient light.
3. Can be used to create time-lapse video.
Short Exposure - Disadvantages
1. Lots of images uses up more memory card space.
2. Must be stacked inputs processing.
3. Cameras operational lifes span is shortened by every "shutter operation".
4. Camera imposed delays between exposures may create gaps in star trails.
Aperture
As you know aperture has two purposes, depth of field (DOF) and the amount of light hitting the sensor while it is exposed. We are less concerned with DOF in astrophotography because the stars are very distant (infinite) from our foreground images that they will be in focus. However the stars are moving, which is what we want but we need them to register on the sensor before they move. If we do not do this by keeping a wide open aperture they will be dim or even none-existent.
Finding the Poles
Though you can capture star trails in any location, you may have noticed many images with a circular pattern around a fixed point, the two poles. It may seem daunting but it is not that hard. If you are shooting toward the north you will aim for Polaris (the North Star), just look for the last star on the handle of the Big Dipper. The south is a little harder as there is no prominent bright star, but you can use astronomy apps such as Stellarium to help locate the north and south poles.
Last Tips
As with astrophotography you will want little light pollution and clear skies to help capture your images. You will require multiple batteries and the process of capturing your images and the cooler temperatures of the night reduces the batteries lifespan. You may want to capture an image exposed for your foreground and blend that with your star trail images in post processing. As the nights are long and cold, dress warm, bring some coffee and a field chair to relax on. Try to learn to change your camera's setting without resorting to using a headlamp or flashlight to preserve your night vision and also lessen the chance of ambient light. Turn off camera's image preview to help preserve battery power.
With photography in general and astrophotography in particular go out and experiment with your camera's settings to see what works for you. If you have any questions feel free to contact me at jblmodrphoto@gmail.com.


No comments:
Post a Comment