Sunday, December 4, 2016

Starburst Effect

Have you ever seen photographs that had the sun or other light sources with that "Starburst" effect on them?  These tips will help you create a very strong focal point for your images and help take your photos to the next level.  Not only can you apply this effect  to the Sun, but any light source has the potential of creating a starburst such as streetlamps and headlights.


When you have a source of light that is significantly brighter than the surrounding environment, the effect is more apparent.  The smaller the aperture the more you will exaggerate the rays of light you see when compared to a wider aperture.  This is caused by diffraction, or when waves of light you see pass close to an object in this case the diaphragm of the lens.  Because a aperture set at f/16 is a smaller opening than compared to wider opening at f/8, you will have a more pronounced effect at f/16 compared to a softer effect at f/8.

You might think I can set it to f/20 or higher and really have a pronounced effect.  At higher f/stops you might see a reduced level of clarity, experiment with different apertures to see what you might consider an acceptable level.

Another factor is the number of diaphragm blades and the shape of the aperture.  You will have very little control of this this factor depending on what lens you purchase.  If the lens has an even number of blades and the aperture shape has an even number of sides you will get a distinct point of the star extending out from each; an eight-blade aperture will give a star with eight points.  Lens with odd number of blades will produce double the distinct points, a nine-bladed design will produce a star with 18 points.  If the aperture is rounded you will not produce a distinct shape.


When shooting the Sun you will want to try and get the Sun as small as possible, such as close to the horizon or when the Sun is obscured partially by an object.

Wednesday, November 30, 2016

2016 Army Digital Photo Contest


The U.S. Army MWR Digital Photography Contest is an event that encourages novice or photography enthusiasts to capture their favorite view, moments or adventures from all over.  The contest opens December 1st and runs until January 31st, you may find out about the rules and enter the contest at http://www.armymwr.com/digital-photo.aspx.

Saturday, November 26, 2016

Photographing Star Trails

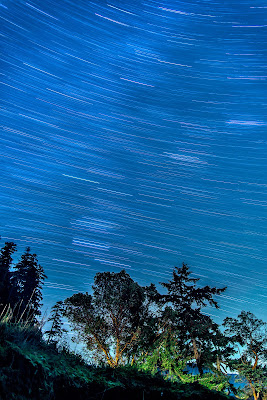
The night sky is an amazing sight to behold and photographing it can be a surreal experience.  One of those amazing images are pictures of star trails.  Some of the basic tips for star trail photography are very straight forward.  Setting your camera to its widest aperture to capture more light, securing the camera on a tripod and using a cable release for the shutter.  There are two methods for capturing star trails, using one very long exposure; at least 30 minutes or taking many shorter exposures and stacking those images in a way that shows sequential movement.


One Long Exposure

To capture star trails with one long exposure will require the use of a cable release to keep the shutter open, as the default time for cameras is 30 seconds.  All you will need to do is attach the cable release and set the camera to "Bulb".  As with other astrophotography you will want the darkest sky possible as the ambient light for the long period of time will not do much for the star trails.  The exact amount of time will depend on the situation you are in, ranging from 10 to 30 to even 90 minutes.  You do not need a very high ISO, 100 to 800 might be sufficient, test shots will help you figure out the settings.  You will also want to turn on the Long exposure noise reduction (LENR) setting on the camera.  LENR is used to to reduce the "hot pixels" that is created when the sensor starts to warm up and create red and blue pixels in the images. LENR will take to images for the same amount of time, one with the normal image and one with a dark frame.  The camera will then reduce and eliminate the hot pixels and create one image.  The down side is that it essentially doubles the time for one picture, a 20 minute exposure will be 40 minutes.

Image Stacking Shorter Exposures

The second method is to take sequential images and then stacking them together in post processing to create star trails.  To create your images you will set your camera as if capturing standard images in astrophotography (See the blog on capturing the Milky Way (http://jblmodrphoto.blogspot.com/2016/11/astrophotography-photographing-milky-way.html).  You will want to wait a couple of seconds between exposures to let the buffer finish processing and to also let the sensor cool down to reduce noise.  Remember to turn off LENR as this will introduce gaps in the star trails.

You can use free software such as StarTrails (www.startrails.de) or StarStax (www.marks-enzweiler.de).  Photoshop can also be used to create star trail images.  Load your images as layers in photoshop, select all layers except the bottom layer and change the blending mode to "lighten".  Another method is to turn off all the layers except the bottom one and then turn them on one at a time and change the blending mode to "lighten".  As you do this any unwanted trails from airplanes can be removed, continue until comlete.

Advantages and Disadvantages

Long Exposure - Advantages
1. Less post processing.
2. When using the cable release the exposure can be set and left alone for a long time without intervention or oversight.
3. LENR can be used to improve images
4. No gaps in trails.
5. No intervalometer is needed.

Long Exposure - Disadvantages
1. It is all or nothing.
2. There may be uncorrectable noise
3. Headlights, flashlights, airplanes may spoil the whole image.
4. LENR turned on double the exposure time.
5.  Requires very dark skies

Short Exposure - Advantages
1. Headlights, flashlights, airplanes mark up one image, the image can be dropped from the stack or edited out easily.
2. May be only solution for strong ambient light.
3. Can be used to create time-lapse video.

Short Exposure - Disadvantages
1. Lots of images uses up more memory card space.
2. Must be stacked inputs processing.
3. Cameras operational lifes span is shortened by every "shutter operation".
4. Camera imposed delays between exposures may create gaps in star trails.

Aperture

As you know aperture has two purposes, depth of field (DOF) and the amount of light hitting the sensor while it is exposed.  We are less concerned with DOF in astrophotography because the stars are very distant (infinite) from our foreground images that they will be in focus.  However the stars are moving, which is what we want but we need them to register on the sensor before they move.  If we do not do this by keeping a wide open aperture they will be dim or even none-existent.

Finding the Poles

Though you can capture star trails in any location, you may have noticed many images with a circular pattern around a fixed point, the two poles.  It may seem daunting but it is not that hard.  If you are shooting toward the north you will aim for Polaris (the North Star), just look for the last star on the handle of the Big Dipper.  The south is a little harder as there is no prominent bright star, but you can use astronomy apps such as Stellarium to help locate the north and south poles.

Last Tips

As with astrophotography you will want little light pollution and clear skies to help capture your images.  You will require multiple batteries and the process of capturing your images and the cooler temperatures of the night reduces the batteries lifespan.  You may want to capture an image exposed for your foreground and blend that with your star trail images in post processing.  As the nights are long and cold, dress warm, bring some coffee and a field chair to relax on.  Try to learn to change your camera's setting without resorting to using a headlamp or flashlight to preserve your night vision and also lessen the chance of ambient light.  Turn off camera's image preview to help preserve battery power.

With photography in general and astrophotography in particular go out and experiment with your camera's settings to see what works for you.  If you have any questions feel free to contact me at jblmodrphoto@gmail.com.


Monday, November 21, 2016

Astrophotography - Photographing the Milky Way

I remember the first time I tried to do Astrophotography and I was disappointed by the results.  I kept trying and making the same and other mistakes, but I kept trying.  Standing out in the cold at 2 a.m., I wondered why I was I doing this.  I would usually shoot too fast or not have my ISO high enough, I did not know where the Milky Way was.  Then one night, everything just clicked.  I could make out that most amazing sight, the Milky Way.  Just seeing it with your naked eye is not quite enough, but when you see it in its bright and beautiful glory on the back of your camera's LCD you truly see it and it's finally put into perspective.

Astrophotography does not require all that much equipment.  

1.  Digital SLR - Any DSLR will work, but a camera with full frame sensor is a better choice.  It can handle higher ISO with better noise ratio and more light can reach the sensor with a full frame sensor.  My Nikon D810 works well for this type of photographing and they even make a D810A that is designed for astrophotography.

2.  Wide Angle Lens - The Milky Way is big and the easiest way to capture it is to use a wide angle lens that allows you to frame a large portion of the sky.  A lens with a focal length of 24mm or shorter works well, the shorter the focal length, the wider the field of view.  For better results utilize a lens with a low f/number, f/2.8 is a good choice.  The lower the number, the larger the aperture of the lens and the more light it can collect for exposing the stars in the night sky.  I use a a Rokinon 14mm f/2.8 lens when I photograph the night sky.

3.  Tripod - A tripod is a good investment in any photography but it is essential in astrophotography.  There are many different tripods to choose from, but there are somethings you might want to think about.  A tripod should be stiff and stable, ensure that you are not close to exceeding the load capacity of the tripod.  This will make the tripod less stable and could tip over with the wind.  Carbon fiber is stiffer and lighter than aluminum, I strongly suggest a tripod that ways less than 5 pounds.

4.  Headlamp - You will need you hands free at night to handle the camera in the dark.  Make sure the headlamp has the red "night vision" option.  This helps retain your night vision for seeing in the dark better and won't interfere with other stargazers in the area.

5.  Optional Items - A cable release or intervalometer.  A cable release will let you trigger the shutter with out touching the camera and is also required for exposures longer than 30 seconds.  You can set the camera to timer and use this option to trigger the shutter, but you can not trigger for longer then 30 seconds.  A intervalometer is a cable release that lets you program in different settings such as exposure time, interval between exposures, or number of exposures.  You can buy a cheap intervalometer for around $20 but most Nikons have a built-in intervalometer.  You will also want to invest in extra batteries as running the exposures and cold temperature will drain battery life quicker.


Finding the Milky Way

One of the first things you need to do when photographing the Milky Way is to find it.  With the advent of technology this is not too hard to do with the many apps that are out there for your smartphone.  Some of the best apps out there for finding the Milky Way include PhotoPills, SkyGuide, Stellarium.  The Milky Way is visible all year; however the galactic center is visible certain times of the year, February to November.  From March to May, the center is visible towards the Southeast and is more diagonal and panoramic.  May to July, the center is visible from the Southeast to the Southwest and is more diagonal.  July to November, the center is visible to the Southwest and is more vertical.

You will want to shoot on clear dark nights in order to get better results.  A night that is 30% or clearer during the new moon phase are the best nights to shoot the Milky Way.  The NOAA website has a chart that will show the sky cover for many areas through the United States.  Clear Dark Sky (www.cleardarksky.com/csk) is another site that can be used for planning purposes.  The best times to shoot is usually the time 1-2 hours after the setting of the Sun or Moon or 2 hours before the rise of the Moon.  For example, wait 2 hours after the sun sets.  The Moon is not as bright as the Sun; the time will be shorter, usually 1 hour.

Focusing Your Lens at  Night

Focusing is by far the most important skill you must learn for astrophotography.  No matter how well you perform any other skills, without a well-focused lens, your photos will not turn out the way you visualized them.

Method 1:  Preset focus point during the day.  It is far easier to ficus during the day than at night.  
Method 2:  Live view focusing at night.  Use live view to zoom on the brightest star, when you turn the focus ring notice the star getting larger and then smaller.  Turn the focus ring until the star is at its smallest, the star should be in focus.
Method 3: Focusing at night with artificial light.  Shine a light source on your subject of focus, manually focus your lens on the lighted subject.

Whatever method you use always use test shots to verify that stars are in focus, if is not in focus try and refocus until the stars are sharp.

Selecting Exposure Time for Astrophotography

The 500 Rule is used to calculate the maximum time a photo can be exposed without exhibiting star trail behind each star in the photo.  The 500 Rule calculated exposure time is only a function of lens focal length.  ISO and Aperture do not affect the 500 Rule calculated exposure time.

If you are shooting with a full frame camera, take the number 500 and divide it by the focal length you will be shooting.  For example, I have a 14mm lens so I take 500 and divide it by 14 and get 35.7 rounded up to 36 seconds.  If you have a crop sensor you will have to multiply the focal length and divide 500 by that factor.  You can get the crop factor by looking at your owner's manual, most will be 1.5 or 1.6 depending on brand.  For this example I have a camera with a 1.5 crop factor.  So 14 times 1.5 equals 21.  500 divided by 21 equals 23.8 rounded up to 24 seconds.  Of course this is a guide so you will have to shoot some test shoots to determine what time works best, fine tune the exposure time by 1-2 seconds either faster or slower.

Selecting ISO

Never increase ISO prior to fine tuning your exposure time based off the 500 rule.  I usually start off at ISO 800, this will usually be dark.  I increase the ISO by one stop until I find the Milky Way is clearly visible in the photos.

Shooting RAW

A RAW file contains much more data than what can be seen on your camera's LCD.  The image seen is a JPEG rendering of a RAW file, it can't show all of the data contained within your file.  You can only view all of this data on your computer.


Other Camera Settings

I shoot evaluative metering as this meters for all scene and not just the center.  Because I shoot RAW I have more leeway for white balance as I can adjust this in post processing, but if you shoot JPEG try using a cooler setting.  If you are not trying to shoot multiple exposure for time-lapse or exposure stacking, turn on your camera's Long Exposure Noise Reduction.  This will take two exposures for same length of time, one with the curtain opened and one with the curtain closed and compare the two and reduce the hot pixels for the exposed image.

Test you Camera Settings & Compare the Images

Take test shoots and try the different settings on your camera.  This lets you see what camera can do for you.  It is all about making multiple shots and experimenting.

Hopefully this will help you get started with Astrophotography, the secret is just keeping trying and not getting frustrated.


Thursday, November 17, 2016

Golden Hour

In photography, light is one of the most important elements to take in consideration.  The prime time shortly after sunrise or before sunset is called "Golden Hour" and this creates almost magical moments to photography.  When you shoot in the middle of the day the Sun is at its highest in the sky.  This results in harsher shadows and a lack of warmth in the sky as the Sun is hitting the land at a higher angle.  When the Sun is lower in the sky the results are different.

During Golden Hour the light is hitting the land at a lower angle it results in less harsh shadows, more texture and details.  Because contrast is less during Golden Hour, shadows are less dark and highlights are less likely to be overexposed.  The light is warmer resulting in orange tones and can bounce off the underside of clouds, resulting in hues that range from orange to pinks to purple.

Though it is referred to Golden Hour, there is no guarantee that this period of time will last 60 minutes.  The window of opportunity can last mere seconds based on conditions and with overcast days really hampering photo opportunities.


Sunday, November 13, 2016

City Night Photography

Why should you stop taking pictures when the sun goes down, night photography is great with outstanding results.  It is not to difficult with some tips and practice you can capture night time city images that you can be proud of.

You do not need any special equipment, a camera and a tripod at a minimum.  When taking night time pictures there is a couple of things to keep in mind.  First a good viewpoint and second, a tripod or sturdy base for the camera.

The contrast between the lights of the city and darkness can sometimes your camera's light meter.  Place your camera's light meter to spot metering and choose a mid toned area for a balanced shot.

To take a photograph of a cityscape during the evening, place the camera on a tripod and turn the mode dial to Aperture Priority (AP) or Aperture Variable (AV) mode;  use an aperture of f/8 and upwards.  You can create a starburst effect on sharp lights at around f/16.  Use the camera's self-timer or a cable release to take the photo.  The best times to shot is around golden or blue hour, the first hour before sunrise and the last hour after sunset.

Bridges that are lit up at night look stunning when photographed well.  Once again place your camera on a tripod and position it so that the bridge, water and any buildings can be seen, for an interesting foreground and background.  Set the mode dial to AP/AV, and choose an aperture of f/16 or more.  Try to get a long exposure shutter speed of 1-30 seconds to make a silky water effect.

The variety of light sources can make an interesting color effect for images taken at night.  For warmer colors set the White Balance to Daylight and to Tungsten for cooler colors.

Know your gear, as it will be dark be sure to know how to operate your camera in minimum light.  Some cameras have better autofocusing than others and can operate in dim light.  Know how to switch your camera to manual focus if the autofocus can not operate at low light.

As for safety, shoot in groups or with at least one other person.  Scout out your areas during the day to get an idea of what the layout is going to be like.

Weather is another consideration to take in account.  Taking pictures after a downpour will leave the roads wet and create beautiful reflections of light, puddles also provide an interesting perspective.


Sunday, November 6, 2016

Fall Photography Tips


Fall around Washington has stunning vistas with red and gold hues of the leaves changing color.  Here a few tips that you might want to try when capturing images during this time of year.

Photo by Kaweka Stoney
Gold Creek Pond
Fall Colors
1. Sunlight behind the leaves of trees look great.  It makes the trees look like they are glowing.  This can be done at anytime of the day but when the sun is just coming up or going down you will get light that is not as harsh.

2.  Try using a polarizer for two reasons.  1, it helps reduce the glare of the sun on the leaves.  Just put on the polarizer and turn it one way or the other until the glare is reduced.  2, it helps the colors pop a little bit more.

3.  Fall color is a great time to put on a long lend and creative shoot tight.  There are so many great looking things with fall photography that you might miss with a wide angle lens.  Shoot tighter.  Use a wider aperture for some depth of field.  Capture backlit trees even closer.

Photo by Kaweka Stoney
Gold Creek Pond
4.  Cloudy days work really well for photographing the fall colors too.  Everything tends to be more flat and evenly lit on a cloudy day or overcast days.  So colors in the leaves stand out even more.  Plus, if you are shooting anything with moving water, those cloudy days help you get a slower shutter speed to make the water smooth.

5.  If you are shooting in tighter and closer on trees on a windy day, then do not forget to raise your ISO.  Generally you do not want to see movement in the leaves, but on a windy day you might.  Just raise the ISO and shutter speed until the leaves are sharp.  Look at your LCD and when the leaves are not blurry anymore, your ISO is at the right spot.
Snoqualmie Falls
Leavenworth


Friday, November 4, 2016

RAW vs JPEG

As you learn to capture images one of the basic questions you may have is what is the best way to capture an image, RAW or JPEG.  If you are trying to get the best out of your image it's important to understand what shooting RAW has to offer.  There is nothing intrinsically wrong with shooting JPEG, they are mostly what we see as photographs.  When you shoot JPEG a lot of information is thrown out when creating the file from the original data that is captured by your camera's sensor.  This makes it practically impossible to recover data that may be lost.

If you retain the RAW file, then the key elements and data are retained for you to process your images with software such as Adobe Lightroom or Photoshop.  An example of why this is good is with a RAW image you can recover details from shadows, which can not be done with a JPEG file.  Another example, when an image is captured in RAW the white balance setting is embedded in the file but you retain the ability to change that with your software, with JPEG you can not.

Pros and Cons

RAW
Pro
Retains full image quality
You control which image data is kept from the surplus available
Better processing on the computer than in-camera
Can often recover exposure loss in the shadows and highlights
Impossible to overwrite by mistake

Con
Large files need more storage space
Not an image file, requires special software to view
Saving large files in-camera may slow down shooting
Processing on computer takes time

JPEG
Pro
Less storage space
Immediately available (printing, uploading, etc)
If perfectly exposed, as good as a processed RAW file

Con
All other image data is discarded
Has some slight image artifacts
No processing headroom means no way of recovering lost data
Not possible to change you mind about settings such as white balance

Whats in a name?

RAW is not an acronym, it means raw as in unprocessed.  It is a file format for storing information captured by the camera's sensor.  Each camera manufacturer has its own way of achieving this, which is why the file suffix is different for each camera.  Nikon uses .NEF, which stands for Nikon Electronic Format.  Canon uses either .CRW or .CR2, which stands for Canon RAW or Canon RAW 2.

JPEG stands for Joint Photographic Expert Group, it is the most common file format for photographs and was designed to transmit images by keeping the file small.  It does this by compressing the information

Thursday, November 3, 2016

Ruby Beach

One of my favorite places to photograph is Ruby Beach in the Olympic National Park.  Here you can find sea stacks, driftwood, pebble-strewn beaches, and a sweeping vista that can capture a photographer's imagination.


This location is great to photograph during the various weather condition's that can be found here.  Fog blows in and disperses quickly, and around sunset it can take on a pink glow. The atmosphere can change quickly. Stormy days with choppy surf can quickly bring a atmosphere to the scene. Late afternoons and sunsets are the best times for dramatic shots.  This location lends itself to some amazing Astrophotography as the Milky Way bisects the sea stacks located here.


To get to this location, travel south from Forks, WA on US 101 for about 27 miles.  You will see a turn off into the parking lot when the road reaches the coast.  From the parking lot you can descend to the beach along a short but steep path.


Seattle Photography Spots

Are you planning a trip to Seattle and wonder where are the best spots to get a photo from.  Here are a few of my favorite areas to capture those amazing images you always wanted.


Kerry Park, Queen Anne

This is that iconic Seattle view that you always see in postcards.  From this location you can capture the iconic skyline with the Space Needle and if the weather is in your favor, Mount Rainier.  This a great spot for those sunrise, sunset and blue-hour photos.  This is a favorite location so be prepared to deal with crowds on a day of good weather.


Jose Rizal Bridge (12th Ave Bridge), Beacon Hill

You can capture the a great sunset or blue-hour images of the Seattle skyline.  At this location you can capture the light trail on I-5 and I-90 .  Be prepared for the buses that pass on the bridge as it can be quite shaky.


West Seattle

West Seattle has an abundant locations to capture vistas of the Seattle skyline, running from Salty's to Alki Point.  This is a great location to capture a panorama of Seattle.


Pier 66 (Bell Street Pier), Bell Town

From the top of the Bell Street Cruise terminal building you capture a great city view that includes the Seattle Great wheel and Mt Rainier.


Seattle Waterfront (Pier 56, 57-62/63

The Seattle waterfront has many areas to capture great images.  During the rainy season you can use the reflections in puddles to capture images.


Pike Place Market

A visit to Seattle is not complete without a stop at the iconic Pike Place Market. The neon signs of the market makes for some very interesting and colorful captures after dark.


Discovery Park

The West Point lighthouse at Discovery Park offers the most amazing foreground for a colorful sunset shot. 


Welcome

Welcome to the JBLM Outdoor Recreation Photography blogspot.  The idea of this blog is to share tips, information, upcoming trips and workshops for photography for the Military community of Joint Base Lewis-McChord and Washington.

The Pacific Northwest is a photographer's paradise.  With the mountains, coast, forests and cities the range of possibilities are limitless.