Monday, February 20, 2017

Shooting Waterfalls

If there is one thing you will find in abundance in the Pacific Northwest are waterfalls.  Here are a couple of tips for when you wan to shoot waterfalls.

1.  What do I need?

The only equipment you need for shooting waterfalls is a camera and a tripod.  Some optional equipment that would be great to have but not required are a polarizer filter and a cable release.  The camera is self-explanatory, the tripod is to have a stable platform for long exposures.  A polarizer will reduce glare of the water and a cable release will help with camera shake because you are not touching the camera when you expose the image.

2.  How long do I exposure for?

This answer is as varied as is people's taste. I break the waterfall into two categories, one where you wan to show the power of the gushing water and have more detail in the water.  The second is where the silky smooth effect shows the grace and beauty of the falls.
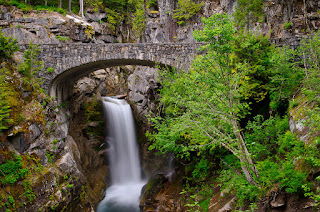
I set my camera to manual and change the ISO to 100.  My aperture is set to achieve maximum focus, usually f/8 to f/11.  For big falls I try to achieve a shutter speed below 1 second, anything between 1/4 and 1 second.  This will still show the motion in the water and still retain detail in that movement.

To achieve a longer shutter speed I adjust to a smaller aperture, even f/22.  With this I can achieve a shutter speed of 1-4 seconds, this will achieve the silky smooth water effect.

3.  Wide Angle or Zoom Lenses?
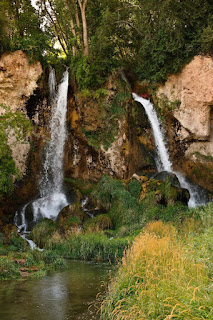
Take both wide-angle and zoom lenses to photograph waterfalls.  High and powerful waterfalls can release large amount of water into the air, getting you or your camera wet or damaged.  Use a telephoto lens such as 70-200mm to photograph falls from a distance and a wide-angle lens such as 16-35mm if the falls are smaller and you are standing close to them.

4. When to go?

Depending on the water source of the waterfall, it may look drastically different throughout the seasons.  If the waterfall is fed by snowmelt it might be dried up by the end of summer.  Late spring or early summer are usually the best time to visit them.

Lighting  conditions also affect when you should try to shot waterfalls.  Balanced and diffused light is great for waterfalls because it helps bring out details in the shadows and amplify the contrast.  The best diffused light occurs on overcast days, but if not then try visiting during sunrise or sunset.  Try to avoid when half of the waterfall is in the shade and half is sunlit.


Saturday, February 4, 2017

Touching up Portraits

Here is a little tip for touching up portraits in Photoshop called Frequency Separation.  Frequency separation works because it allows you to separate the texture of an image from the color and the tone.  When retouching you can focus on just the texture or the skin just beneath it.

Before
After

Step 1.   Creating Copies

In Photoshop, create two copies from the base image.  Name the first copy "Low Freq Blur" and the second copy "High Freq Texture".  Toggle the "High Freq Texture" layer visibility to off.  Group the two layers into a folder and rename it Frequency Separation.

Creating copies

Step 2.   Adding Gaussian Blur

Select the "Low Freq Blur" layer.  Then go to to Filter, Blur and select Gaussian Blur.  Add enough blur to the image that the texture disappears but not enough that everything blends together.  The amount depends on the photo but 4 to 8 is a good estimate.

Step 3.  Apply the Image

For the next step, toggle "High Freq Separation" layer to on.  Then select the High layer and go to Image and then Apply Image.In the layer selection choose the "Low" layer.  For the blending selection choose Subtract.  Add the value 2 for Scale and 128 for Offset.

Once you select the values, the image will turn gray with some faint details.  The faint details are the details blurred out from the "Low" layer.  Change the layer blending mode to Linear Light to finish the step.

Applying the image

Step 4. Remove Blotches

The next step is to remove the uneven colors of the skin.  Select the "Low" layer.  Use the lasso tool and select an area of uneven skin tone.  Change the feather to around 30px to make the transition smoother.  Once you made the selection, add more Gaussian Blur to it.  Set the blur radius to a point to where the skin tone blends well.  Repeat this for all areas where you think there is uneven skin tone.

You can also clone out areas where there are different colors on the skin, such as pimples or a dark scar.  Once you cloned it out, select the general area of the imperfection and then apply Gaussian blur to even it out.  In this step of Frequency Separation you are only dealing with the skin color or tone and not the details.


Step 5.  Edit Textures

For step 5, select "High" layer.  Select the Cloning Tool and change the Sample Layer to Current Layer.  Clone out the imperfections such as scars and pimple.  When you clone out things on this layer you are only cloning out the texture and not the color, so you can sample from an area with different color and apply it to another.

The last thing you will want to do is adjust the opacity of the group.  You can apply as much or as little of this effect to your overall image.  Set the opacity to what you think works well.  That is Frequency Separation.


Saturday, January 7, 2017

Winter Photography Tips

As you have noticed Winter has arrived and with it many opportunities to capture great images.  Here are some tips I have found to help with your capturing those images.

GEAR

1.  Dress appropriately for the occasion.

This goes without saying but remember dressing for 32-degree weather is not the same as dressing for 0-degree weather.  Do not over-dress, it is better to feel a slight chill while standing rather than overheating while walking.  Take gloves, wear a thin pair of gloves for use while photographing and take a pair of mittens to slip on in between shooting.

2.  Keep your camera cold.

Have you ever noticed how glasses instantly fog when coming into warmth after being out in the cold?  This easily can happen to your camera, fogging the mirror and causing harmful condensation inside the lens.  Do not make the mistake of placing your camera under your coat to keep it warm.  The warmth of your body and moisture from sweet can be potentially harmful.

3.  Keep your batteries warm.

Nothing drains batteries faster than the cold,  keep extra batteries in a pocket or inside your coat close to your body heat.  Once a battery drains place exchange it with a fresh one and place in inside the pocket, once the battery warms it can be used again until fully discharged.

4. Keep gear readily accessible.


You do not want to be fueling around a bag or drooping equipment in the snow.  You do not wan to be setting your bag down in the snow and getting it saturated with water.

TECHNIQUES

5.  Shoot RAW.

I always shoot RAW, this gives you the greatest flexibility in post-production and let you easily fix problems that would be harder, if not impossible to correct shooting in JPEG.

6.  Be aware of your footprints.

Keep in mind your intended shoot, you do not want to walk through an area that you want to include in your composition.

7.  Use your camera's Manual Mode.

Snow is bright and will affect your camera's internal light meter.  If use AUTO or APERTURE PRIORITY/SHUTTER PRIORITY it will result in dark images since the camera is reading all bright light reflected from the snow and compensating accordingly.  You can overcome this imbalance by either adjusting the EV compensation or metering for a dark object by pressing the shutter halfway and then moving the camera, with the shutter still halfway depressed, to reframe and capture your shot.

8.  Slightly overexpose your images for whiter snow.

While snow will look white to the human eye, often snow in a photography will have a blue tint or look grayed out.  If you have a gray card, you can use it to set a custom white balance.  If not you can give the photos a little more light than necessary, if it is too bright you can tone it down in Lightroom or Aperture later.

9.  Use your camera's histogram.

The LCD display on your camera will not show the most accurate brightness of the snow.  Use the histogram to determine what actual exposure your camera is getting.

10.  How to get rid of falling snow.

When shooting in falling snow, the snow flakes closer to the camera have a tendency to detract from the image.  You can eliminate this is to use a tripod, decrease the ISO, increase your aperture and shoot with a longer shutter speed.  The snowflakes will not have enough time to be captured as they are falling.

11. You want to capture the falling snow.

Sometimes you want to capture the falling snow.  To get the best shot, consider using a telephoto lens, 70mm and up.  For the best conditions use a 200mm lens and shoot at a shallow aperture (f/4-f/6).  Set up with the fastest shutter speed you can (1/400th of a second or faster).  This will create an effect where the snowflakes right in front and right behind the focus point appear to be larger.

BACK HOME

12.  Warm up your camera slowly.

The best way to eliminate the possibility if condensation is to place your gear back in it's bag before bringing it in and allowing it to sit for a while before opening it back up.  This allows the camera to warm slowly up to room temperature, just be sure you remove the memory card before going inside.

13.  Drying your camera.

If your camera ever gets wet, bring it indoors, then wrap a dry town around it.  Let it set for several hours.  If you try to wipe the snow or water off, you run the risk of pushing it inside the seams where the electronic components are.  Just let the camera sit and let the towel absorb all the moisture.